10 Settings That Will Instantly Improve Your Gameplay
VALORANT offers a plethora of settings that can be tweaked to optimize your gaming experience. However, the sheer number of options can be overwhelming for players. This comprehensive guide will walk you through the top 10 settings you should consider changing to improve your VALORANT gameplay instantly.
#1: Turn Off Corpses

In the heat of a match, the map can quickly become cluttered with the virtual corpses of fallen players. This can be distracting, especially when you’re trying to focus on the enemy’s movements and abilities. Moreover, these additional elements can strain your system, causing your FPS and overall performance to drop, affecting your gameplay. By turning off corpses in the ‘general’ settings, you can reduce visual clutter and potentially boost your FPS, leading to smoother gameplay. Settings like this one might seem trivial, but they can make a significant difference in high-stakes matches.
#2: Turn On Blood

Show Blood is another setting that, when turned on, provides visual feedback when your shots land on an enemy. You’ll see a burst of red, confirming that your shot was successful. This can be particularly satisfying and can also help improve your aim over time. By providing immediate feedback, the blood setting allows you to adjust your aim more accurately, helping you become a more effective player over time.
#3: Turn Off Spectator Count

While it can be exciting to know that others are watching your epic plays, the spectator count can also add unnecessary pressure. This can lead to performance anxiety, causing you to make mistakes you wouldn’t normally make. By turning off the spectator count, you can focus solely on your game, free from worrying about how many people are watching.
#4: Optimize Your Video Settings to Improve Performance
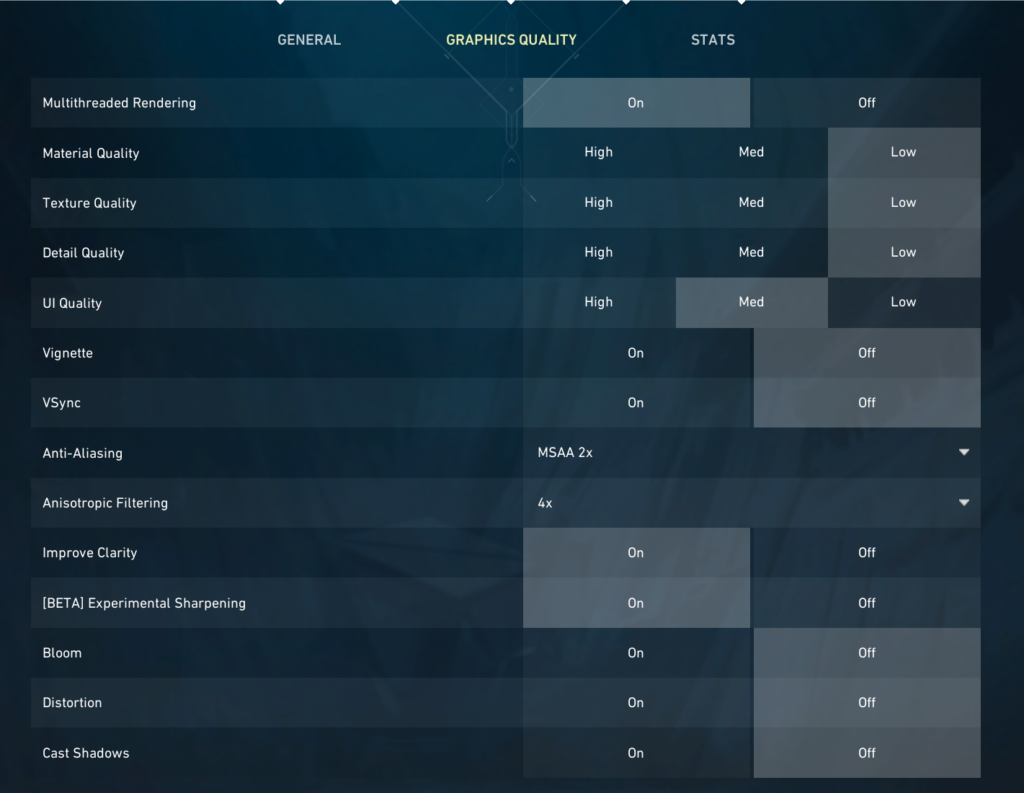
In a match, every millisecond counts. Therefore, maintaining high FPS is crucial for a smooth and responsive gameplay experience. The resolution setting plays a pivotal role in this. While playing at your monitor’s native resolution offers the best visual fidelity, it can be demanding on your system. If you’re struggling with low frame rates, consider reducing the resolution slightly. This can provide a significant boost in performance, albeit at the cost of visual sharpness. Additionally, ensure that your FPS is uncapped for the best results. This allows your game to run at the maximum FPS your system can handle, offering the smoothest possible gameplay.
As a good starting point, try lowering your Graphics Quality settings to the ones we have provided in the screenshot above. If you find that you have high, consistent framerates with reliable performance, you can either leave them there or tweak them upward slightly. Just remember, incremental changes with one setting at a time are the easiest way to track how high you can set the quality before you begin to sacrifice your performance for visuals.
#5: Sync Your Monitor’s Refresh Rate with Windows Settings
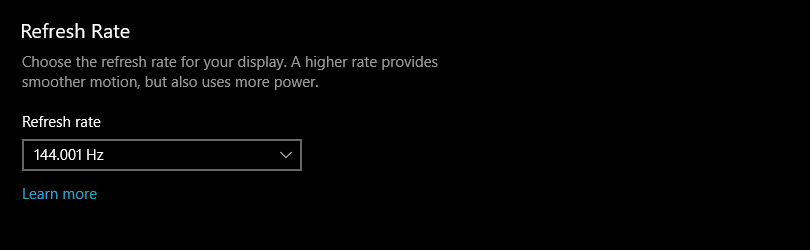
Your monitor’s refresh rate and your Windows settings need to be in sync for optimal gaming performance. If they don’t match, your game could stutter, lag, or experience visual screen tearing behaviors which will disrupt your experience and performance. This is because your monitor might be refreshing faster or slower than your game is rendering frames, leading to screen tearing or input lag. By syncing your monitor’s refresh rate with your Windows settings, you ensure that every frame rendered by your game is displayed correctly, leading to smoother and more responsive gameplay.
A good rule of thumb is to find your monitor’s model number and locate the company’s website to determine exactly what refresh rate your monitor should be running at. This is an important step as monitors can range as low as 60hz refresh rate, up to 144hz, and even as high as 360hz in some of the higher-end options.
#6: Enhance Colors with Nvidia’s Digital Vibrance
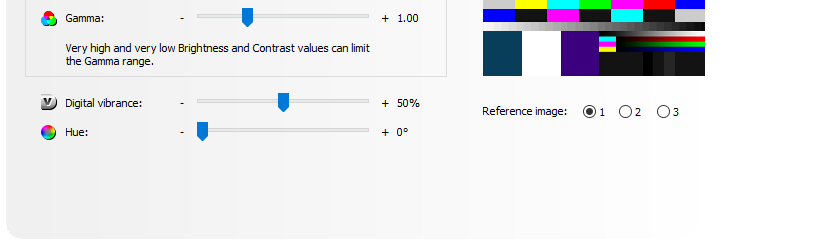
Aesthetics play a significant role in gaming. The more visually appealing a game is, the more immersive the experience. While VALORANT isn’t the most graphically intensive game, it can still benefit from enhanced colors. Nvidia’s Digital Vibrance setting can make the game’s colors pop, making it easier to distinguish between different elements in the game. This not only makes the game more visually appealing but can also provide a competitive edge by making enemies easier to spot. You will still have to play with this to find what looks the best for you on your monitor, so remember that there’s no universal ‘right answer’ to the perfect digital vibrance setting.
If you’re not an Nvidia user and you have something like an AMD graphics card, you may see an option called AMD Saturation that will work in a similar effort.
#7: Enable HRTF for Audio

It goes without saying that sound is one of the most important factors in a competitive game like VALORANT. The ability to hear enemy footsteps or the activation of abilities can give you valuable information about your opponents’ location and strategies. The Head-Related Transfer Function (HRTF) setting enhances your ability to determine the direction of these sounds, giving you a more accurate sense of where they’re coming from. This can give you a significant advantage in the game, allowing you to anticipate enemy movements and react accordingly.
#8: Enable Raw Input Buffer

The raw input buffer setting is one of the more technical settings that can have a significant impact on your gameplay. It allows VALORANT to directly access the input from your mouse hardware, bypassing the operating system. This reduces the delay between when you move your mouse and when your crosshair moves in-game, leading to more precise aiming and shooting. By enabling the raw input buffer, you can ensure that every movement of your mouse is accurately reflected in your game, giving you the edge in those critical gunfights.
#9: Disable Scroll Wheel for Weapon Swaps
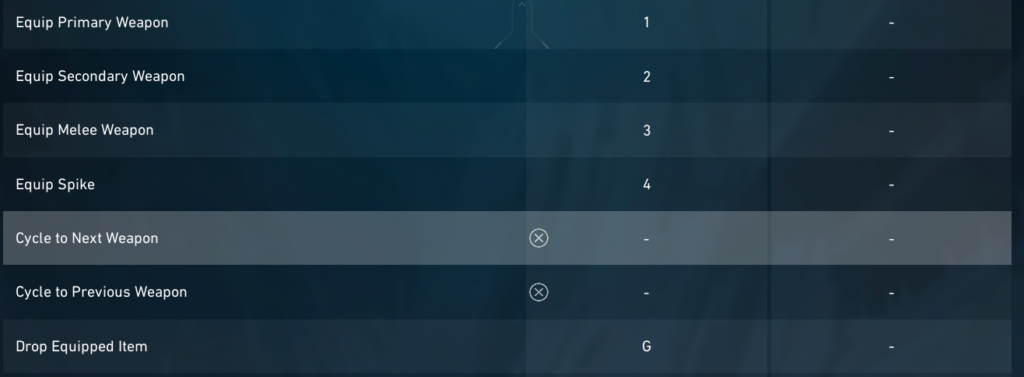
While using the scroll wheel to switch weapons might seem convenient, it can lead to costly mistakes. In the heat of a battle, a slight slip of the finger could switch you to the wrong weapon, potentially costing you the match. By using keybinds for weapon swaps, you have more precise control over your arsenal, ensuring that you have the right tool for the job at all times.
To unbind the mousewheel from weapon swap, simply navigate to the Equipment settings under Controls, and click the minus button next to the mousewheel options on the “Cycle to Weapon” settings.
#10: Use the Clutch Mute Key

Communication is the key to teamwork, but there are times when silence is golden. During critical moments, the chatter of teammates can be more distracting than helpful. The clutch mute key allows you to quickly silence your team, allowing you to focus entirely on your game. This can be particularly useful in high-pressure situations where concentration is key.
Head over to the Communications settings under Controls, and you’ll see the clutch mute key near the top of the list. We would suggest that you bind this to a key that will be convenient to reach in the heat of battle, then get out there and win those 1v3’s without hearing grief from your teammates until the next round!