The Ultimate Fortnite FPS, Latency, and Colorblind Mode Guide
With Season 3 of Fortnite imminent, there’s no better time than now to optimize your settings and tweak your performance until your FPS feels so smooth you would think you were playing on a supercomputer. Well, maybe not quite a supercomputer but, the tips in this guide will help you get the most out of your hardware, ensuring that your Fortnite will be running buttery smooth when you drop into Season 3.
Video Settings
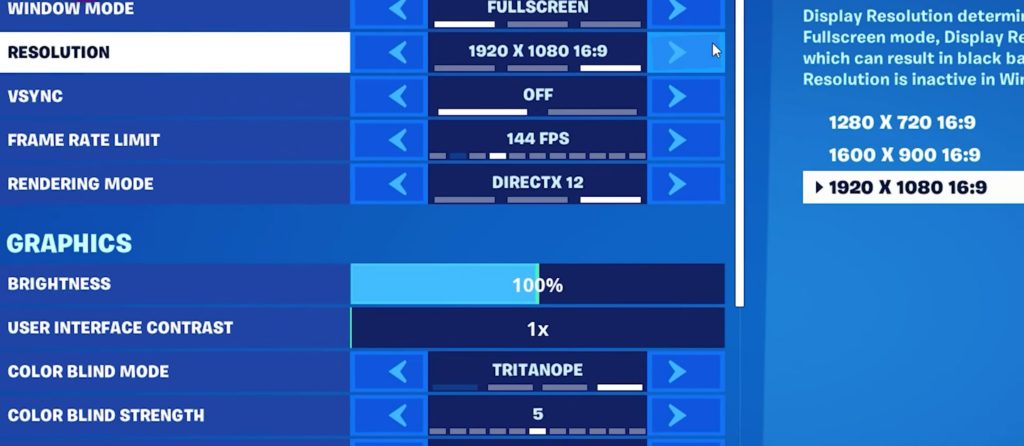
First things first, we’re going to make sure that your in-game video settings are optimized. The first setting you’ll want to adjust is your resolution, which we suggest you set to 1920×1080. Some players have been experimenting with 1600×900, and some others are even using custom resolutions, but the slight boost in performance that you’ll game from those is not really worth reducing your game to look similar to a Playstation 1 game.
While your monitor might be VSYNC compatible, we still suggest you disable it. The feature simply doesn’t work well in Fortnite and at times, it will even reduce your system’s performance ceiling. The frame rate limit should come down to what your monitor can support, so if your monitor supports 144hz, set this to 144 frames. If you’re using a 60hz budget monitor, set it to 60 frames and you will be good to go.
If you find that your hardware is not the strongest, and it’s unable to run at the frame rate that your monitor supports, we suggest you set your frame rate limit down to the next lowest setting. This will allow you to play at a consistent frame rate and avoid any noticeable frame drops while you’re playing. Sure, your computer might occasionally hit 144 FPS, but if it is dipping often, you will want to prioritize the smoother performance in the long run.
Rendering Mode
Your brightness setting is going to ultimately come down to personal preference. Most players stick with 100% brightness, but there are other players that swear by 110%. Either way, this is not going to have any impact on your overall performance. Colorblind mode is similar to your brightness, it is a visual preference option and not something that will have any impact on the smoothness of the game. Few players are making use of this, but we would suggest you swap between the options to see if any work for you.
While tweaking your in-game settings is the best way to improve your game performance, there are some additional measures that you can take outside of the game to give your system more of a boost. For example, you can open the NVIDIA Control Panel and select the option to “Adjust image settings with preview” option, then select the “Use the advanced 3D image settings” option. Disabling options such as Image Scale, Ambient Occlusion, and DSR, while allowing the application to control Anisotropic Filtering, and Antialiasing will help to smooth out Fortnite on your system.
Shadow Reflections and View Distance
Now we’re going to switch over to the Graphics Quality options and see what we can adjust on there to help improve your overall Fortnite experience. You could start out by selecting the Low quality preset, but we will get more specific than that.
Start by disabling Antialiasing and Super Resolution, but leave Temporal Super Resolution at the recommended setting. Next up is 3D resolution, which is one of the major frame rate impactors. We would suggest lowering it to 80% from 100%. You won’t want to lower this too far, as it can affect the visual fidelity and make it harder to see things in-game. That being said, if you’re playing on a particularly old system, this is a setting that you can continue to tweak and lower to get a good framerate boost.
Next, disable Dynamic 3D resolution, Nanite Virtualized Geometry, Shadows, Global Illumination, and Reflections. Further down the list is View Distance, which is another setting that similar to 3D resolution, will provide you with some serious performance gains as you set it to low, though you could try the medium setting to see if your system can handle it without your performance being reduced.
For the Textures setting, turn that down to low, before moving on to disable the Auto Download High Resolution Textures, and while you’re here, you can also remove the High Resolution Textures reminders. Finally, turn down the Effects and Post Processing settings to the low option.
In the advanced graphics section, you will likely see an option called “NVIDIA Reflex Low Latency”, and if you’re using an NVIDIA graphics card, you can potentially make use of this. We would suggest some trial and error experiments to see what feels right for this option. If you’re on a PC with mid-range specs, you should be able to enable this, but this one comes down to your preference.
Ping
Now that we’ve covered the graphics options and your system’s performance, we’re going to look at some methods to lower your ping and improve your internet connection overall. It doesn’t take countless hours in Fortnite for the average player to have experienced the impact that bad ping can have on your gameplay, and that can feel even worse when you’re up against a skilled player.
The majority of Fortnite players would prefer to play with zero latency at all, but that’s not very realistic. If you can get your ping below 30, you’re in great shape, but there are only so many things that you can truly tweak to improve your ping.
The first suggestion here is, if it is at all possible, to make sure that you are using a wired connection to your router instead of wifi. A wired connection offers several advantages over wifi, which makes them the clear choice in network connections while you’re gaming. One primary benefit here is as simple as maintaining a stable connection, as wired connections are not impacted by noise from other wireless devices.
Ethernet cables will avoid potential environmental issues, while they still offer higher bandwidth transmission rates, all without being bogged down by network congestion or other issues with the overall signal strength.
If you absolutely have to use a wifi network, try to be within a reliable range of your network. If that is not entirely realistic, we would suggest that you invest in a wifi range extender to provide more wifi coverage around your area. You can also connect an ethernet cable to your wifi range extender, giving your PC a wired connection of sorts. It’s not going to provide the same speeds as a fully wired connection, but it will be better than the alternative.
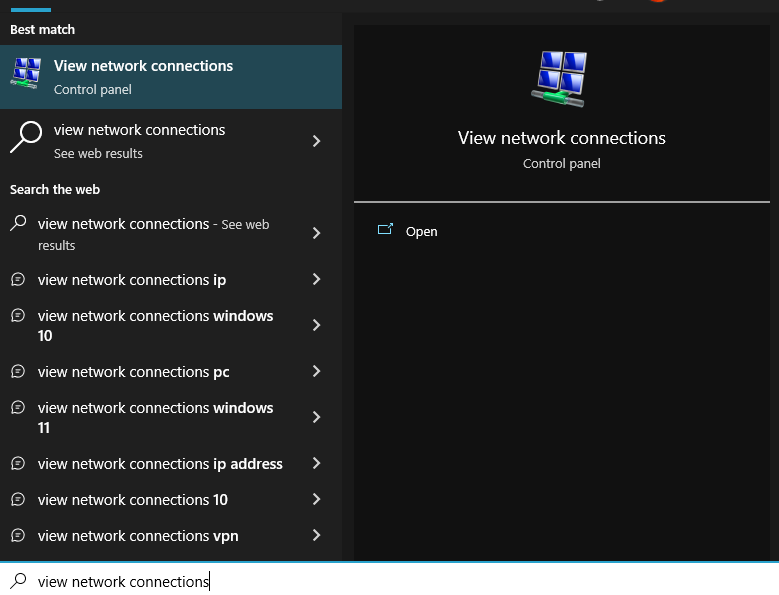
If you find that your connection is still weak, you can adjust your DNS server settings. First, bring up the Windows search bar and type in “view network connections”. Once that is open, right-click on your internet connection and navigate to the properties tab. Double-click on the “Internet protocol version 4” option and then select the option to change your DNS server address. We’d recommend that you use Google’s DNS server by typing “8 8 8 8” under the preferred DNS server box, and then add “8 8 8 4” under the alternative DNS server box. Some users may notice a significant improvement in their connection, though others may not notice anything at all. Regardless, it may still be worth testing.
Other Tips
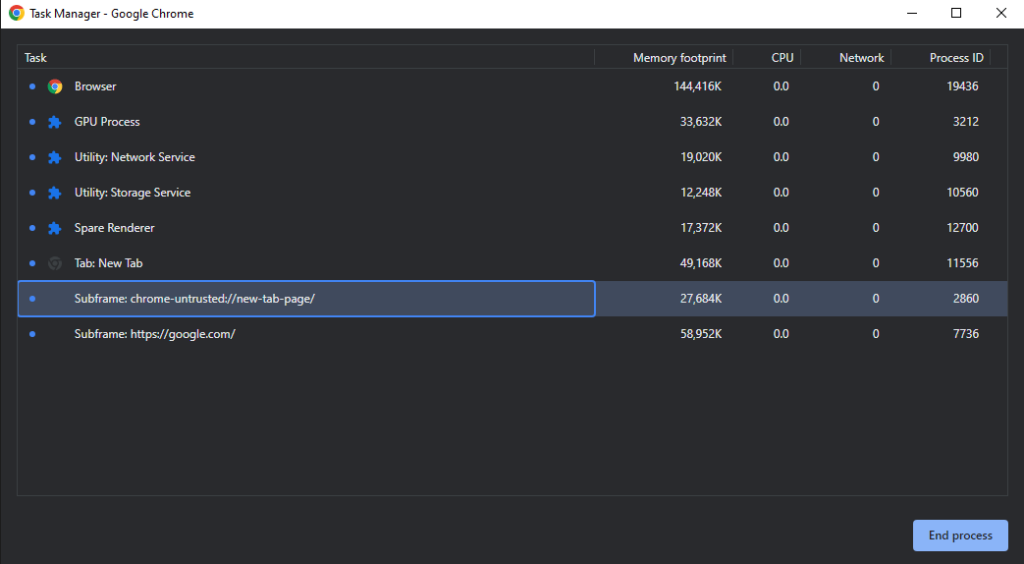
If you’ve already worked through the optimization settings above and you’re still not seeing notable improvements, don’t worry because we’ve still got a few tricks up our sleeve! There are still a few small changes that you can make to improve your overall performance, such as making sure that any apps, programs, or browser tabs are fully closed while you play. Apps such as Spotify and Discord running in the background can have a significant impact on your framerates and connection performance, which can lead to additional input delay on your end.
Something as innocuous as a blank Google Chrome tab being open can make a considerable difference, especially if you are only running with 16gb of RAM or less. It may come as some surprise, but even Pro players with sponsor-provided top-of-the-line PCs will limit the number of apps that they have running while they play.
If you are using a multi-screen setup and have a live wallpaper, make sure that you either set the speed to zero or disable it completely. We get it, the wallpaper looks great, but there’s no point in having it active while you’re playing, so why not disable it to help get the most out of your PC?
Windows Tricks
You may not realize it, but configurations from previous seasons may still be lurking in your system which can cause some performance issues. A good practice to account for this would be to head into your files and reset your configurations manually. There’s a bit of legwork involved here, but it is easier than it looks.
First, hit the Windows key and the R key at the same time. This is going to open up a command box where you will need to type in the following:
%LOCALAPPDATA%
After hitting enter, your computer’s AppData/Local should open up. Single-click onto a folder and then tap your F key, this will scroll you down to the F section where you will locate the FortniteGame folder. As a safety precaution, we would suggest duplicating the FortniteGame folder. Copying and pasting it into the Local folder should create an option called “Copy”, or you can manually rename it to something such as “FortniteGame – Backup”. After this, delete the original folder before going and launching Fortnite, as this will create a fresh new folder and configuration.
When you load up Fortnite next, you should see the lobby with a bluish background, which is the lower input delay background. If you see this, you have successfully reset your config. You can also double-check by going to the in-game video settings and confirming that everything has returned to the default settings. Unfortunately, yes, you will need to run back through the guide to tweak the in-game settings once more if you followed these steps.
Head back to the FortniteGame folder, click on Saved, and then click on Config before heading into WindowsClient. You’ll see a file called “GameUserSettings.ini. Right-click on this file and select edit, here you can manually tweak settings on the text level, or confirm that other changes have been saved.
Boosting RAM
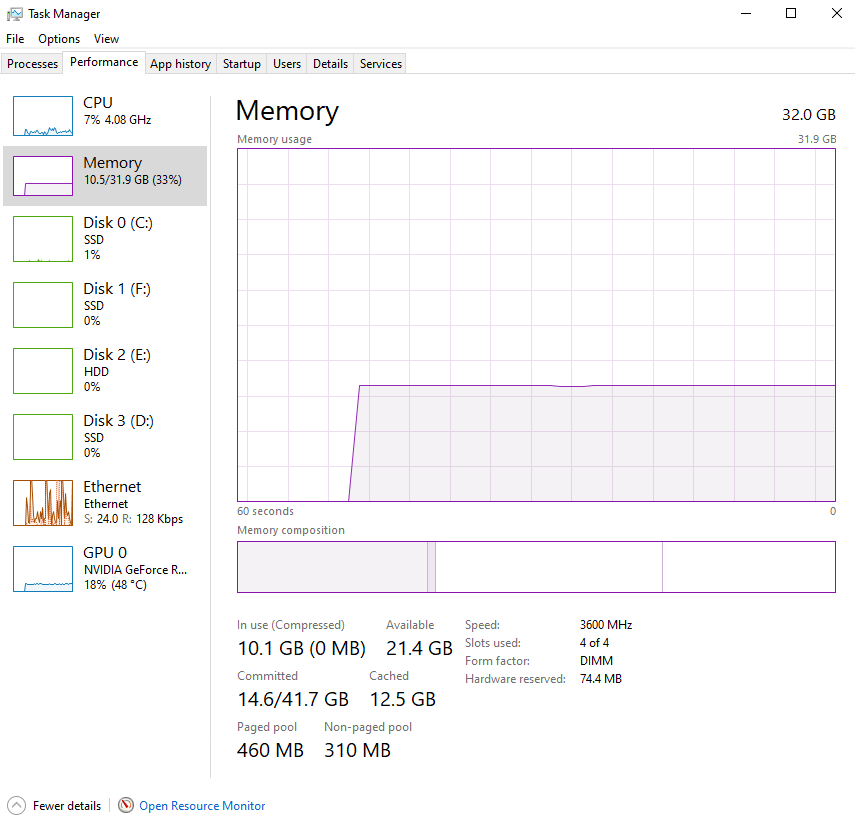
It may be difficult to know if your RAM is providing you with the performance that you expected, but we have a guide on how you can check. First, hold down Control, Alt, and Delete and pull up your Task Manager. Next, click on the Performance tab, and then click on Memory on the left-hand side. You should see an option that says Speed towards the bottom, and if your RAM is working properly, it will be running at the default speed. We would suggest checking the model of your RAM and comparing the numbers you’re seeing. If it seems to be lower, you will need to enable XMP through your Bios. This isn’t any kind of overclock option, it is just a method to get the most out of your RAM.
Press down the Shift key and Restart your PC. Next, click Troubleshoot and Advanced Options, before going to the UEFI Firmware Settings, then you will Restart. Now, each motherboard manufacturer is different, but you should have the option to enable XMP. If you have an AMD processor, XMP may be worded as something different such as EXPO or DOCP. Once you have the option enabled, save and exit from your Bios menu, and then confirm that your RAM is running at the correct speed again. Afterward, you’re free to begin mapping out your loot path without being held back by subpar PC performance!