One Great Tip for Every VALORANT Agent
Whether you’re looking to settle in on a main, looking to expand your agent pool, or just want to know what you can expect from the opposing team, learning more about agents is always a great practice. We’ve put together a tip for each VALORANT agent, and if they can’t give you something new you can try yourself, they’ll give you some ideas about what to look out for in the future. Let’s get started.
Killjoy
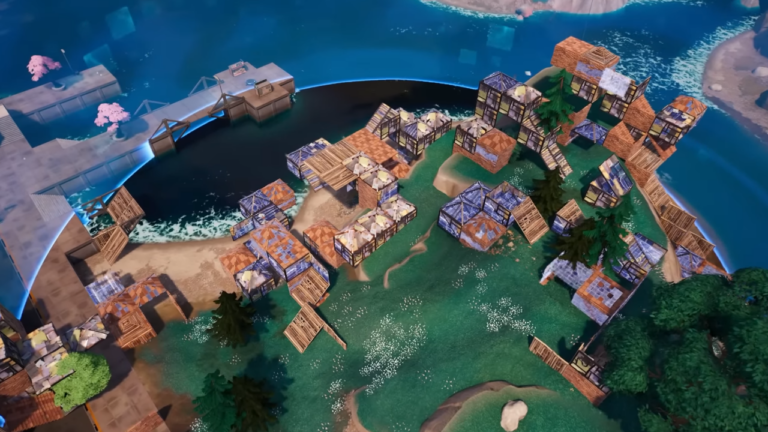
To prevent the enemies from shooting out your mollies, we recommend that you start to put them behind walls or objects. For example, on Ascent, a common place for people to have their killjoy mollies is on lane. However, most people would do a similar setup where they simply put the mollies in the open making it very easy to shoot them.
With something as simple as putting one behind this part of the boathouse and here on the floor, it makes it near impossible for the enemies to realize where the mollies are located, without having some ‘first hand experience’.
Phoenix
There has been a lot of hype in the past due to the discovery that you can use your sound circle to throw Viper lineups from anywhere, but the same can be done with Phoenix’s molly! When throwing it, the maximum distance it can go is 32m which happens to be the same as the outer ring of the sound circle! So testing this in combination with a flash can prove to be insanely powerful!
Brimstone
Moving onto Brimstone, his ultimate can be very loud, as a result of this, if you are near his ult it is impossible to hear your footsteps or any utility that is thrown afterward. A great tip is to reposition yourself after you or another Brimmy pops orbital strike to try and catch the enemies off guard from a different and unexpected spot.
Chamber
Though Chamber was nerfed and had his TP reduced from two charges to one, the single TP charge goes extremely far, giving you a lot of outside-of-the-box ideas for positioning.
One example would be toward A short on Haven allows you to peek a main safely, it also gives you an opportunity to peek short. Although the long peek is easy and safe, be careful as enemies can rush you on short, so make sure you have a teammate to protect you.
Cypher
One thing that we see a lot from Cypher players is that they use both their traps on the site they are playing on. However, It is much better to put a trap in a choke point of the map to allow a player to stack toward another site instead of them holding this angle unnecessarily.
For example, on A site on Haven, most Cypher players like to play both traps on A site. A much better setup like this, where they put a trap on B so the team can leave the site open and put an extra player towards C or A is preferred. Although agents like Omen and Jett can get past this trap, the audible sound queue from the nearby players can alert the team.
Fade
Fade is coming up next on our list, and as you probably know, her haunt has this super cool feature where you can hear it when it lands. Now, if your reveals keep getting shot, we’ve got a little trick for you. Instead of just tossing the reveal and crossing your fingers, why not team it up with an Omen or KAY/O flash? This way, the chances of your eye getting the info you need go way up! And if your reveal still gets shot right away, no worries—just switch things up and try another spot.
Omen
Okay, so we’ve noticed a bunch of Omen mains love to smoke the site entrance to stop a push, but then they get hit with all sorts of flashes, stuns, arrows—you name it. Here’s a hot tip: try dropping a smoke right onto the site instead of blocking the main entrance. This makes enemies way more cautious when pushing in. Let’s be real, most teams will just ignore that entrance smoke if they’re rushing.
Now, if you smoke on site, you can actually hide in it and pick off any enemies that wander in. You might even get a chance to TP out after scoring a kill. In a pro game, Boaster once pulled off this move with Astra against Vitality on C site Haven. And you know what? This tip works for all smokes, not just Omen’s—think Brimstone, Viper, and Astra!
Gekko
A bunch of Gekko players love using their Wingman to plant the spike, and sure, that’s cool and all. But guess what? You can make it even better! Treat your Wingman like a Boombot and let it clear some tight angles before your team dives into the site.
The best part? You can grab Wingman back, and after just 10 seconds, he’s ready for round 2! So, clear those corners first, and then go for the plant. It’s way more effective than making your beloved Wingman a spike-exclusive ability! And hey, if you’ve already taken the space, or your team is running low on players, planting with him is still a solid move.
Harbor
So, up next is our buddy Harbour. Don’t forget to grab his Cove when you’re on the attacker’s side during a pistol round. It takes 17 shots with the Ghost or 20 Classic bullets to destroy the Cove, so you’ll have no problem getting that spike planted. Sure, it’s a bit costly, and you must pass on the Ghost, but you can still rock a Frenzy instead. And with a relatively free plant, that’s not a bad trade-off, right?
Breach
So, let’s talk about Breach. When we watch people play him, we often see that players are unsure when to use his stun. Some choose to concuss the main entrances, while others randomly stun where they think a player might be.
When the enemies are pushing a site, hold your stun out fully and watch the minimap. If your teammates spot someone, direct your stun right where they saw the enemy, and send that thing out. It’s a super effective way to give your opponents a headache, and it’ll certainly help your team get that free kill!
Jett
The most important ability of Jett’s kit is her dash; it helps her get out of danger or aid her team by entering onto site. What most people don’t know is that if you combine all three of Jett’s abilities into one, it can make you an impossible target to hit. For example: while entering on C site Haven, putting a smoke on top of the main box and updraft dashing into it makes it harder for enemies to shoot you compared to just a standard dash onto site.
KAY/O
KAY/O’s ultimate is crazy strong—it’s seriously one of the most OP ults for wrecking your enemy’s defense. But here’s the thing: many people don’t know the best time to use it on defense. You might think it’s great for retakes, but you know what’s even better? Popping it when an enemy ult gets activated. Imagine this: you hear the enemy Raze announcing her party into site, and you just hit “X” like a boss, disabling their push. Boom! Your teammate gets to stay alive slightly longer, and the rotation rolls in for an instant game-changer.
Neon
Neon’s Overdrive ability is designed to help her quickly close the gap with enemies and engage them in close-quarters combat. When activated, Overdrive grants Neon a temporary speed boost, making her faster and more agile. Therefore a key tip to making the most out of Overdrive is that it’s essential to always move while the ability is active; if you just stand still, you’re wasting its potential, so if you’re in a duel spam A-D-A-D-A-D like your life depends on it.
That being said, you still need to be careful not to expose yourself to too many angles; this is where we see a lot of Neons fail and end up dying alone. You might be fast, but you’re not “run in alone and kill 5 people from 5 different angles fast”. Still, try to be sensible.
Sage
When playing Sage, it is vital to take space from the enemies and deny them from retaking it. A lot of Sage mains think that their one and only job is to wall mid on Split, for example. But the truth is, you have to be adaptable. The Split mid wall is either super strong or super weak, and whether in your game that’s option 1 or 2 is not about how you place, but rather about when and why you do.
If you wall mid just for the sake of walling mid and therefore see it broken in the first 10 seconds of each round, then you could’ve gotten the same information with a much cheaper Skye flash. Even an early jump peek could give similar info.
It might sound counterintuitive, but you should only wall mid if you notice enemies aren’t going there. Why? Well, it allows for easy rotations, making your site holds much stronger.
But, and this is key: if your opponents play differently, and they’re actually sending a lot of people mid, then you have to do something else. Wall in B heaven, or plop it down on one of either mains. That way, you can afford to pay more attention to where the opponents ARE actually going.
Sova
For Sova, his arrows can be used for more than just scouting; if the situation calls for it, they can also be used as reliable decoys to attack your enemies. If you’re in a 1v1, send a low-charge double-bounce dart around the corner. Your arrow will swiftly hit the ground, bounce back up, and repeat the process. When you do this: the strange trajectory of the arrow will catch enemies holding you off guard, allowing you to swing and quickly eliminate them.
Skye
Skye’s flash ability is a powerful tool that blinds enemies and provides a great source of information. When used correctly, Skye’s flash can reveal enemy positions, allowing her and her team to gain valuable information about the enemy team’s strategy and positioning. Using an info-flash is very easy and incredibly effective. Simply flash the part of the map you’re concerned about and listen closely to find out if enemies are in that area. Doing this often, particularly on defense is a very good way to help with everyone’s decision making as you can easily dictate where to put your resources.
Raze
Hey Raze mains, listen up! Instead of chucking your grenade at the start of the round, dreaming of a wild ace, or scoring some chip damage, how about saving it for a retake? Few players will expect a Raze nade coming their way while they’re holding their post-plant angle—and it’s way more likely to score you a kill! Just toss that nade into a common corner where enemies usually play, and they’ll be forced to either peek or get wrecked by your grenade.
Astra
When she was introduced to the game, Astra’s stars were easy to use as they were borderline broken, but nowadays, after many nerfs, she takes a little bit more knowledge to work them well.
Generally speaking, it is best to employ just two stars during pre-round, possibly to work in tandem with your teammates’ utility, and then save the other two stars for reactionary purposes. For example, if they start rushing your site, it’s a great idea to put a suck down to delay the enemies and allow your team to rotate and help you.
Viper
Alright, next up, we’ve got Viper! We’ve noticed that a lot of people think you need to be a total lineup larry to use her. But guess what? You can still be a Viper god without knowing any! Instead of seeing your snakebites as a spike-stalling tool, why not use them to clear common angles and really help your site takes? In fact, if you’re insistent on studying, it’s better to learn effective line-ups for these kinds of spots than to know 4 different post-plant ones.
Reyna
Since Reyna had her flash buffed, it has made her Leer immediately blind anyone with vision of it regardless of distance. This makes throwing it well all the more important, as it’s harder to counter. So as a general tip, throw your flashes high where you expect to path towards; this way, it’ll blind more angles, and if your enemies try to shoot it, you’ll know where they are, and they’ll have to hit a nice flick.
Yoru
Last but not least, we’ve got Yoru! And though this isn’t often discussed, his ult is a massive counter to Viper’s Pit. Most of the time, Viper plays solo site when they pop their ultimate. So, all you have to do is chat with your team and tell them to shoot your silhouette when you spot her hiding in the clouds. Boom! Viper’s survival chances drop to nearly zero, and your team can waltz right into the site without breaking a sweat.
We apologize for not offering a tip on Deadlock, but keep your eyes peeled on ProGuides to see more in-depth Deadlock content in the future! Until then, good luck out there.